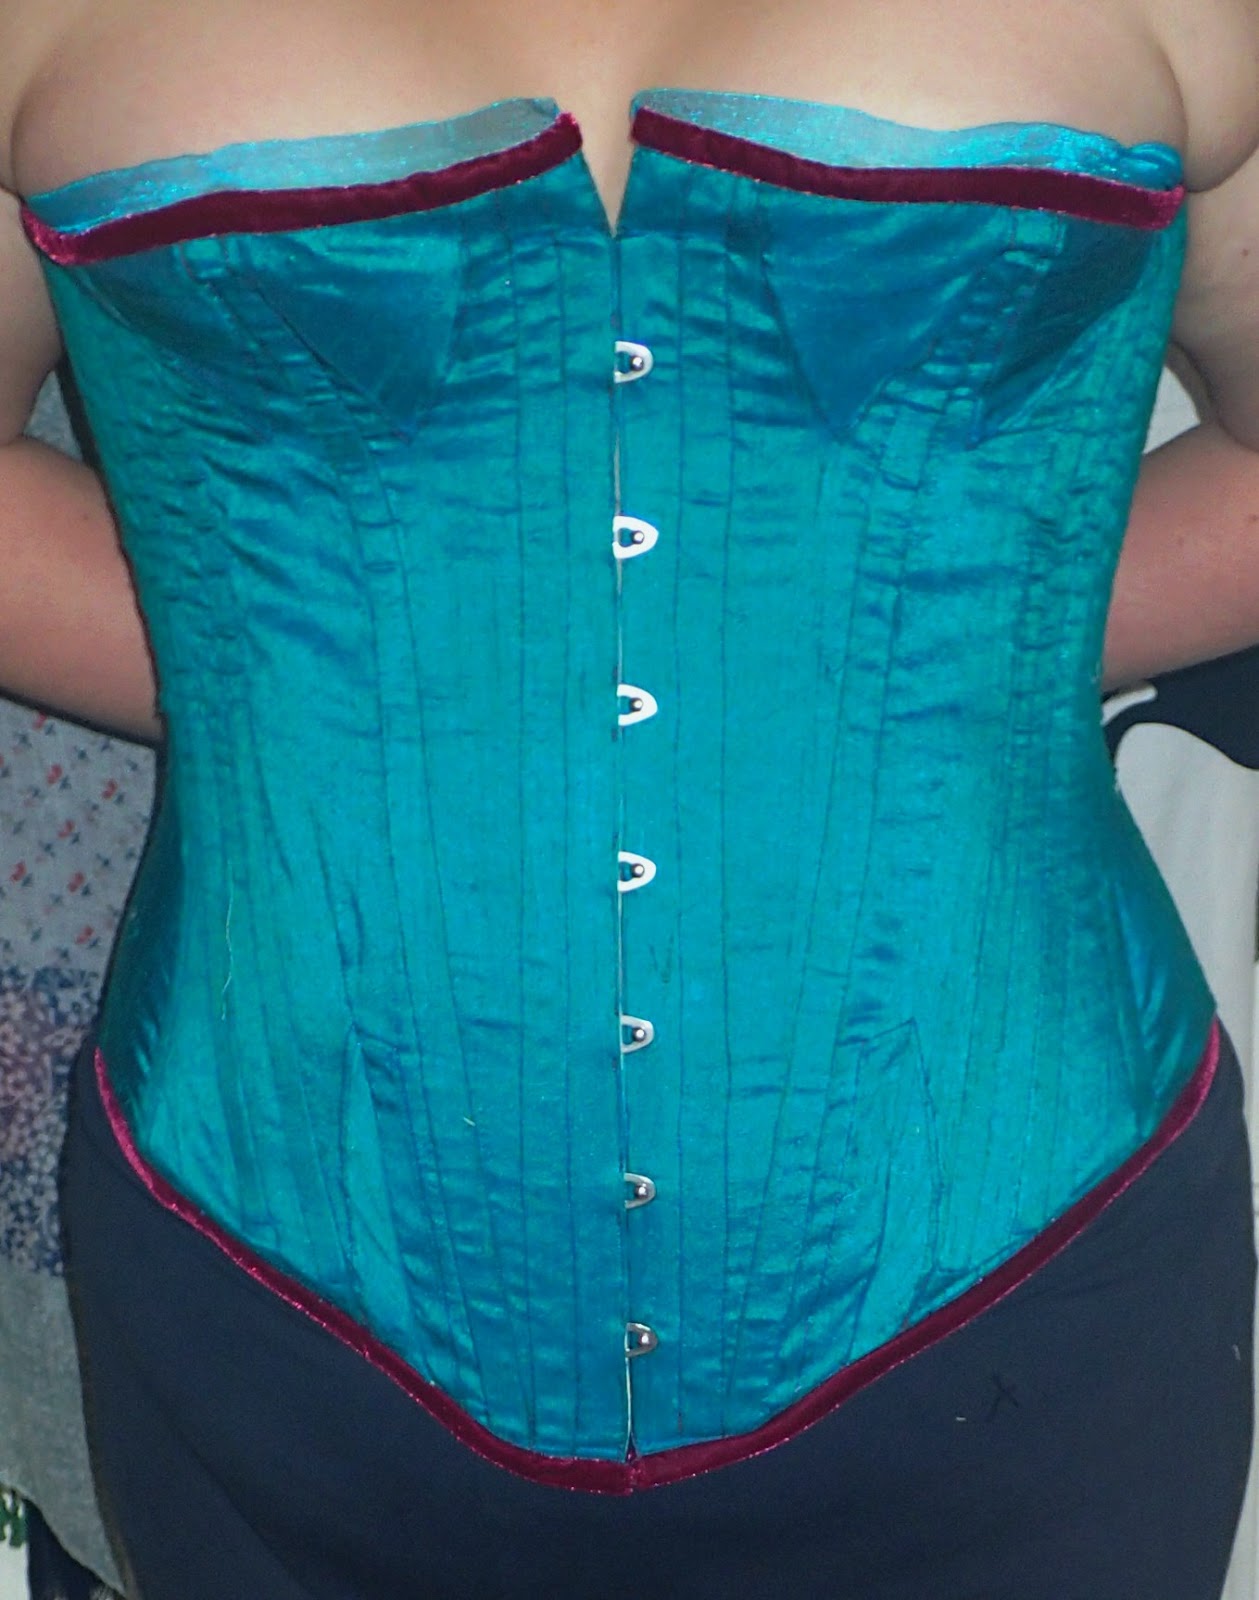
So my first challenge in my quest for the 1860s outfit of my dreams was the construction of a corset.
As mentioned in my previous post "Victorian Madness" I decided on the Mantua Maker 1865 - 1880 corset pattern based on my positive experience with their Regency Corset pattern.
Materials:
- 1.5m Coutil, drab coloured (lining and interlining)
- 1m Dupioni Silk, turquoise
- 1m cotton fabric for mock-up
- A spool of each: Turquoise silk threat, Chery Red all purpose threat, Cream all purpose threat
- 38cm Busk
- 24 Steel Bones
- 3m / 2.5cm wide Velvet Ribbon, Cherry Red (instead of bias binding)
- 1.5m / 1.5cm wide sheer turquoise ribbon (decorative)
- 1 hook & eye (to keep the front / top from gaping)
- 5mm Eyelets
- 7m / 1cm wide grosgrain ribbon for lacing
Instructions:
The instructions are clear and easy to follow even for someone relatively new to sewing as myself. Each step is explained clearly and it is nearly impossible to go wrong along the way.
I particularly like the extracts of instructions provided with the original pattern published in Harper's Bazaar 1871. Especially the period instructions for inserting gores were great and my gores finally look perfect! (OK it still took some practice but they really knew how things should be done back then and hand sowing them paid off)
The only improvement I would propose is the length of the busk they recommend.
I lengthened the pattern by 3cm (1 1/4 '') and ended up using a 38cm (15'') busk and it could be an inch (2.5cm) longer without a problem. In the instructions they recommend a 12'' (30.5cm) busk and that would have definitely been too short even without lengthening the corset.
I would recommend, as with the steel boning, to produce the mock up and then measure along the seams to get a length that works for you.
The Pattern Sheet:
Nice heavy paper, clear lines and labels ... nothing to improve.
The Fit:
Oh well, here it goes...
My measurement resulted in choosing size 18 (= UK 20)
I made a mock up as usual from some old cotton fabric (well it really was a 2nd hand bedsheet) and the fit seemed OK at first.
It is hard to fit such things alone so I did my best to adjust it by myself. I added 2cm on either side of the centre back as I like my corsets to close that little bit closer than historically accurate. I also lengthened the pattern by 3cm as I have a long upper body but after this I was rather happy with the interim result.

I proceeded with the real deal and suddenly the fit was just off! While the top half fitted just perfect, the lower front over my stomach didn't at all.
It's sort of hard to see on the photo but the front really sticks out!
It appears that after I added the boning and there was a certain stiffness to the construction the front jutted out so much I could insert my hand as far up as my belly button ... I was seriously displeased!
Not only does it look funny it also means support is lacking in the lower half of the corset and it makes it very uncomfortable to wear! And no ... lacing it tighter did not solve the problem ... I had a friend lace me to within an inch of my life (5cm / 2'' tighter than I usually go) and still no change!
After a week of annoyance and a refusal to look at the darned thing I decided to salvage it ... rather un-historically ... and insert 2 darts in the lower front....

The darts worked well but turned out to be much bigger and longer than I first thought necessary. While it is not the best fitting corset ever, and certainly not a good as my Regency stays it will do for now.
The new front: Darts were inserted where the front gore was, which is now much reduced.
In hind sight it was really my own fault.
When I made my Regency corset a year ago I completely removed the gores in the lower front and adjusted the back to make some room and I should have done the same here.
I find is a recurring problem with pattern from the US (not only corsets). Perhaps average body shapes are slightly different from continent to continent or I'm just the odd one out .... oh well ... what ever the case next time I know better!

A positive point are the diagonal bones in the back. As a lady with lots of 'squish' I find corsets often create a bulge above the top that is very unsightly (well the 'squish' has to go somewhere!). With the diagonal boning this effect is much reduced, if not completely avoided. It is certainly a technique I will keep in mind for future corset projects.
Not completely happy with the back but it will have to do.
Summary
All in all I like the pattern as it is easy to follow and the pieces fit well together. The overall silhouette looks great and is even suitable for a slightly earlier period. In my case I use it as the base for a ca.1860 crinoline outfit in the manner of 'Gone with the Wind'.
Overall working time, including the salvage operation, was approximately 40 hours. This time can be much reduced with someone very experienced or if you machine sew the gores.
Downside:
- The fit can be problematic, especially if you have no one to help you when trying it on.
- The bust recommended is definitely too short.
No comments:
Post a Comment