Showing posts with label Victorian. Show all posts

Saturday, 19 October 2013

Chemise for 'off shoulder' dresses (Civil War / Victorian Ball Gowns etc.)

This was the very first garment I ever made some time back, however at the time I found it unsuitable for the regency clothes I was making as it fits off the shoulder. I 'recycled' it into a more regency one but now, with the dawn of my 1860s ballgown, I needed a chemise just like this that wouldn't show.


Materials used:

Cotton lawn (voile) 150cm / 60'' wide (114cm / 45'' works too)
Bias Binding
threat


In general the pattern follows the Sewing Academies free Chemise patter and is really simple and easy to follow.

However, I made several changes that make it even easier and faster.

 Measure around your widest part, add a min of 50cm ... this is how much fabric you will need. Cut the fabric in half (from selvage to selvage not lenght wise) then fold each piece in half  (see picture).


Use the pattern from the sewing academy to draw your chemise body, making sure you measure the desired length UP from the selvage so you won't need to hem you chemise (cut 2, front and back).

Proceed to draw the sleeve pattern as directed, however, place the sleeve opening (line 4 to 5) along the selvage (see picture). Unless your fabric is very narrow  there should have been enough fabric left from above the chemise body to use for your sleeves.

Measure your desired neckline as outlined in the pattern or, if you already own the dress, measure it's neckline and add 3''/ 7cm. Add a seam allowance, cut the Bias binding to this length and sew into a loop.

After all the pattern drafting and cutting in this way you only have  to sew 7 seams!

A) Attach the sleeves to the chemise body (4 seams)

B)  Sew the 2 long side seams

C) Attach the bias binding to the neckline gathering the centre front and back (no gathers over the shoulders)  to fit the lenght of the loop.


FINISHED!


Thursday, 17 October 2013

Victorian Beaded Bag Update

Oh dear ... what did I get myself into?! The beading takes forever so realistically the bag should be finished sometime in 2015.


 3 hours of work between the image 
above and the one to the right ...


The 5 square inch finished took about 15 hours (or as I measure them 2 1/2 time the complete Pride and Prejudice with Colin Firth).

Despite the slow progress I'm very pleased in how it looks so it's worthwhile the effort. I decided to go for different size beads as it gives the design more texture.


Monday, 16 September 2013

1860s Bonnet - Accessorise Head to Toe Challenge

With a Victorian Field day coming up in mid September I set out to make my very own 'Gone with the Wind' outfit. As no respectable woman would have left the house without a hat I obviously had to make one too! Better still this project fitted in with the Accessorise Head to Toe Challenge I'm taking part in.


Inspiration:

After looking at extant examples from the period online I found 2 fashion plates that I liked and that I decided to base my design on.


Godey's Lady's Book, October 1865


Peterson's Magazine, May 1862


The bonnet is to go with a crinoline dress made from burgundy tweed suiting trimmed in black so the colour scheme of the bonnet will be in similar colours (Image with completed bonnet below).


Materials:

  • Dupioni Silk in black and gold
  • Buckram
  • Millinery wire
  • Cotton flannel
  • various ribbons, lace & silk flowers

  • packing paper 
  • scissors, stabler, needle & threat
  • glue


The Making of ...

As I didn't have a pattern or template I started off by cutting a rough shape from paper and tried my 'bonnet'. I cut, stabled and adjusted it until it looked roughly like the bonnet shape I was after and took it in stride from there. I have never been afraid about improvising and usually go by the premise 'as long as it looks good it doesn't matter how you got there'


Once I achieved the desired look I cut the shape from the buckram and covered one side with cotton flannel (the buckram has a 'iron fabric on' side). I basted the back centre seam together and then sewed millinery wire along all edges to give it shape and stability.


Following this I covered the outside with cotton flannel, the only time I used glue along the edges to secure the overlapping fabric.The flannel creates a smooth surface and a certain softness allowing the covering fabric to lay smoothly across the buckram body.


The next step is the production of the bonnet cover with black silk on the outside and gold fabric pleated on the inside and a black trim along the sedge (see image). I attached the black silk over the outside, leaving the inner fabric unattached to allow me to sew on the trimmings and hiding the threat under the inner lining.


I experimented a little with various trims until I felt happy with the look.Finally I attached the lining fabric and the basic bonnet was finished. I sewed 2 tied from the black silk with fringing at the end to match the dress, and attached these.


All in all the work was done in about 9 hours over 2 days. Everything is hand sown except the long seams on the ties.


Wednesday, 4 September 2013

Truly Victorian Round Cage Crinoline

No 1860s outfit without a crinoline...
and after all the Petticoat in the last post was obviously supported by this 'contraption'

Once again I use a pattern by Truly Victorian, apart from being available from UK supplier they also give the fabric and notion requirements on their page so I can order everything together.

 I followed the pattern for the most part however I wanted the crinoline a little longer as given in the pattern. While the possibilities for shortening or lengthening the pattern were mentioned in the directions, no instructions on 'how to' were given.

After some deliberation I decided to sew the bag at the bottom as normal, using a old bedsheet for the fabric. I then cut a new template for the straps made out of grosgrain ribbon, adding 1cm between each hoop and 1cm to the loop at the top. This resulted in an extra 8cm total, a length I felt was sufficient.

Don't forget to take into consideration the shoes you intend to wear with your outfit and whether they have heals to detriment he correct length for you. I'm 1.74m (5'8'') and wear shoes with small 5cm / 2'' heals and have to lengthen most dress / skirt patterns.


The construction...

Cutting the wire was a little challenge and if you have a second person at hand I would advise you get them to help ... the wire does tend to spring and snap in every direction.

Finishing of the bag with the 4 hoops was no problem and I used a combination of extra strong glue and metal clamps to connect the wire.

After inserting the wire into the bone casing it was a little difficult to clamp/glue the wire together, cover the connection with the bone casing and then sew the bone casing together. It just looked a bit messy so I decided to add a 'cover' of grosgrain ribbon over the connections.

I furthermore decided against the woven band used as belting and rather used an actual belt I had lying around at home. It has the added advantage the if I use the same belt hole I have an immediate measure of my waist and know that all my upper garments will fit as they are cut to that waist measurement.

All in all the construction was easy and any difficulties were more due to the unwieldiness of steel boning than the instructions / construction plan.

 
Last but not least I have to say that I love the swinging motion the crinoline creates when walking or dancing and even sitting down is no problem in it.

Thursday, 29 August 2013

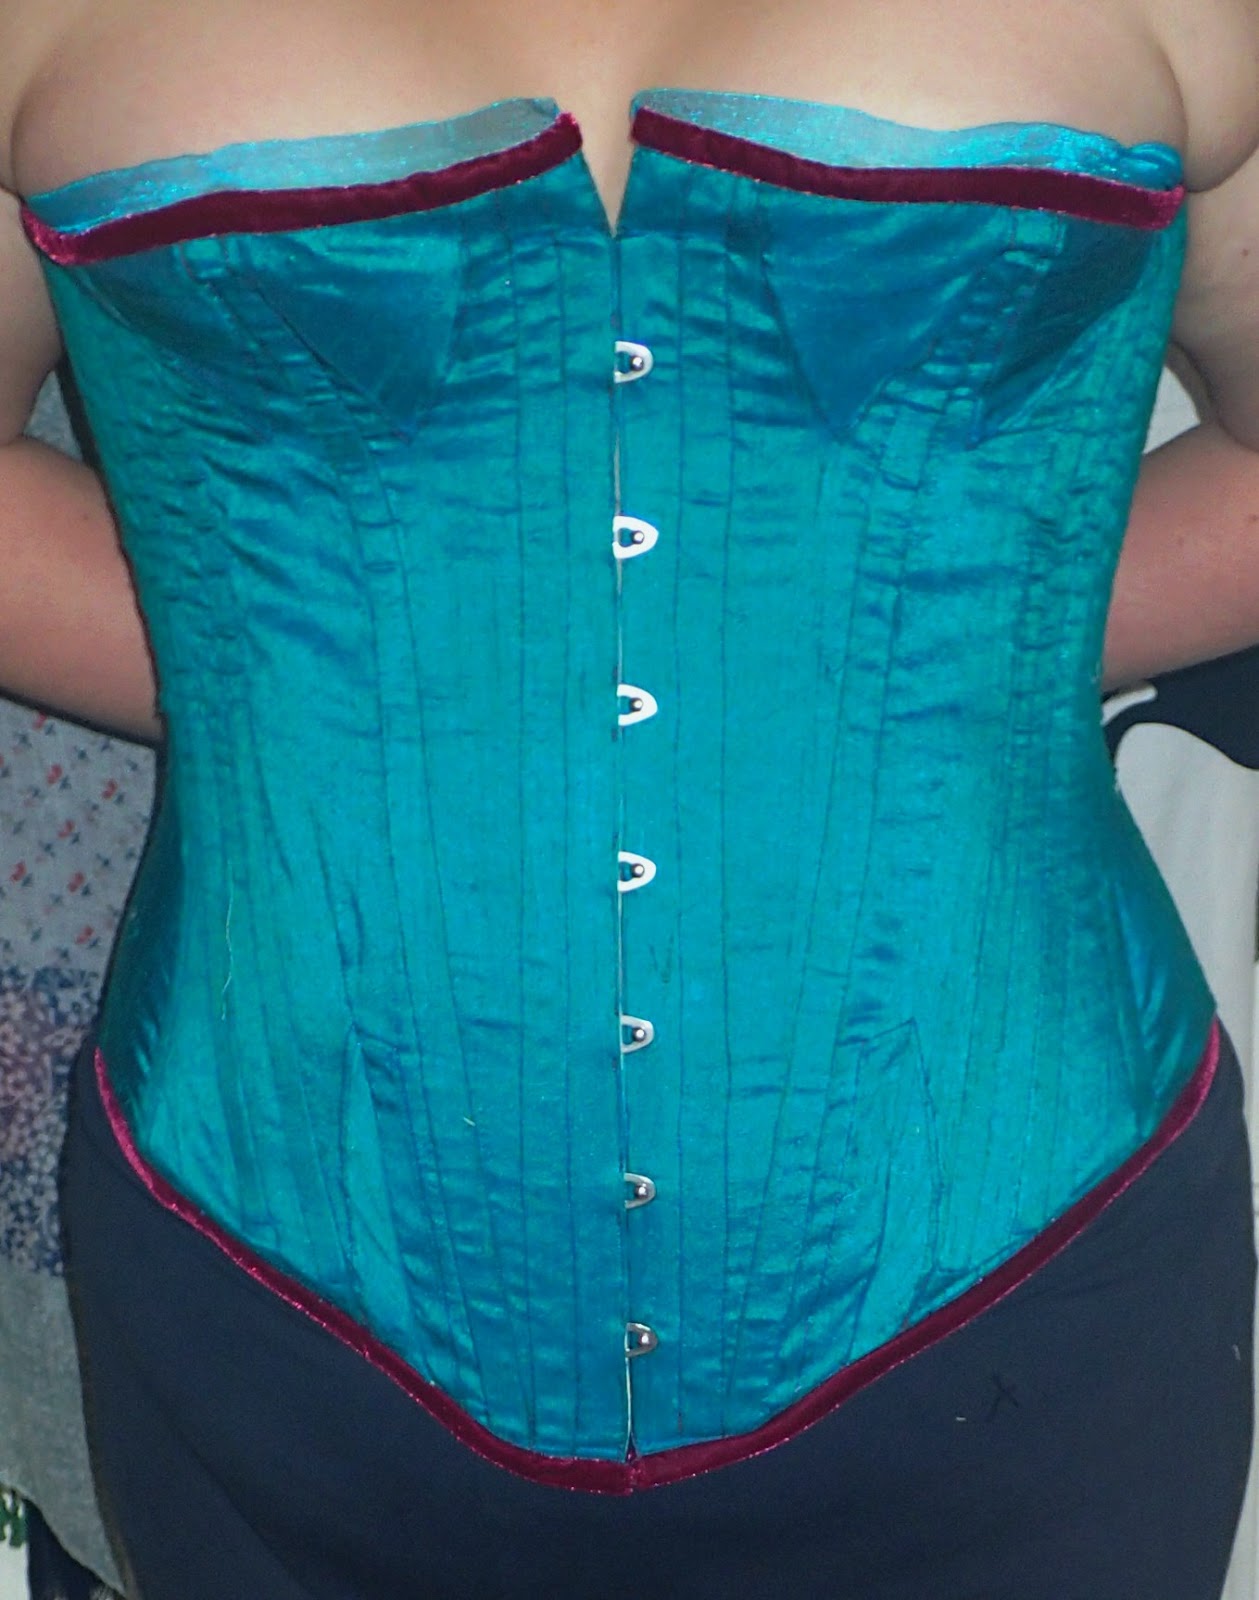
Mantua Maker 1865 - 1880 Corset

As with most historic costume you really need to work from he inside out! 
So my first challenge in my quest for the 1860s outfit of my dreams was the construction of a corset.

As mentioned in my previous post "Victorian Madness" I decided on the Mantua Maker 1865 - 1880 corset pattern  based on my positive experience with their Regency Corset pattern.


Materials:


  • 1.5m Coutil, drab coloured (lining and interlining)
  • 1m Dupioni Silk, turquoise
  • 1m cotton fabric for mock-up 
  • A spool of each: Turquoise silk threat, Chery Red all purpose threat, Cream  all purpose threat
  •  38cm Busk
  • 24 Steel Bones

  • 3m / 2.5cm wide Velvet Ribbon, Cherry Red (instead of bias binding)
  • 1.5m / 1.5cm wide sheer turquoise ribbon (decorative)
  • 1 hook & eye (to keep the front / top from gaping)
  • 5mm Eyelets
  • 7m / 1cm wide grosgrain ribbon  for lacing


Instructions:

The instructions are clear and easy to follow even for someone relatively new to sewing as myself. Each step is explained clearly and it is nearly impossible to go wrong along the way. 

I particularly like the extracts of instructions provided with the original pattern published in Harper's Bazaar 1871. Especially the period instructions for inserting gores were great and my gores finally look perfect! (OK it still took some practice but they really knew how things should be done back then and hand sowing them paid off)

The only improvement I would propose is the length of the busk they recommend.

I lengthened the pattern by 3cm (1 1/4 '') and ended up using a 38cm (15'') busk and it could be an inch (2.5cm) longer without a problem. In the instructions they recommend a 12'' (30.5cm) busk and that would have definitely been too short even without lengthening the corset.

I would recommend, as with the steel boning, to produce the mock up and then measure along the seams to get a length that works for you.


The Pattern Sheet:

Nice heavy paper, clear lines and labels ... nothing to improve.


The Fit:

Oh well, here it goes...

My measurement resulted in choosing size 18  (= UK 20) 

I made a mock up as usual from some old cotton fabric (well it really was a 2nd hand bedsheet) and the fit seemed OK at first. 

It is hard to fit such things alone so I did my best to adjust it by myself. I added 2cm on either side of the centre back as I like my corsets to close that little bit closer than historically accurate. I also lengthened the pattern by 3cm as I have a long upper body but after this I was rather happy with the interim result.


I proceeded with the real deal and suddenly the fit was just off! While the top half fitted just perfect, the lower front over my stomach didn't at all.


        It's sort of hard to see on the photo but the                                                  front really sticks out!


It appears that after I added the boning and there was a certain stiffness to the construction the front jutted out so much I could insert my hand as far up as my belly button ... I was seriously displeased! 


Not only does it look funny it also means support is lacking in the lower half of the corset and it makes it very uncomfortable to wear! And no ... lacing it tighter did not solve the problem ... I had a friend lace me to within an inch of my life (5cm / 2'' tighter than I usually go) and still no change!


After a week of annoyance and a refusal to look at the darned thing I decided to salvage it ... rather un-historically ... and insert 2 darts in the lower front....


The darts worked well but turned out to be much bigger and longer than I first thought necessary. While it is not the best fitting corset ever, and certainly not a good as my Regency stays it will do for now.


The new front: Darts were inserted where the front gore was, which is now much reduced.


In hind sight it was really my own fault. 
When I made my Regency corset a year ago I completely removed the gores in the lower front and adjusted the back to make some room and I should have done the same here.  

I find is a recurring problem with pattern from the US (not only corsets). Perhaps average body shapes are slightly different from continent to continent or I'm just the odd one out .... oh well ... what ever the case next time I know better! 


A positive point are the diagonal bones in the back. As a lady with lots of 'squish' I find corsets often create a bulge above the top that is very unsightly (well the 'squish' has to go somewhere!). With the diagonal boning this effect is much reduced, if not completely avoided. It is certainly a technique I will keep in mind for future corset projects. 


 Not completely happy with the back but it will have to do.


Summary

All in all I like the pattern as it is easy to follow and the pieces fit well together. The overall silhouette looks great and is even suitable for a slightly earlier period. In my case I use it as the base for a ca.1860 crinoline outfit in the manner of 'Gone with the Wind'.

Overall working time, including the salvage operation, was approximately 40 hours. This time can be much reduced with someone very experienced or if you machine sew the gores.

Downside:
  1. The fit can be problematic, especially if you have no one to help you when trying it on. 
  2. The bust recommended is definitely too short.


Thursday, 22 August 2013

Victorian Madness

Until recently my historic wardrobe consisted essentially of Regency clothes, however as there is a Victorian Field Day approaching in early September it became clear that a new outfit was needed. And what better excuse than to make a truly splendid early Victorian crinoline dress alla Gone with the Wind?!

I started the planning / sourcing process in late June so 2 1/2 month to finish the outfit from head to toe!
It is now about 5 weeks later and great progress has been made, the corset, crinoline and skirt are finished and the petticoat needs about another hour of work. I will write reviews of the patterns over the next week or so.

But really it all started with

a) the hard decision which patterns to use
b) the even more taunting decision on fabrics 


 The end result will be something along the
 lines of this dress shown on the 
Truly Victorian website,

                 ... except less ruffles 
and more demure colouring ...


First up were the patterns  and I ended up with the following list

 
Underthings: 

I draft the pattern for chemise' myself as they are so easy to do and drawstrings / gathers can adjust the fit.

The drawers are made after a self drafting pattern by The Sewing Academy I mentioned in the Blog post about sewing on a budget.  


Corset:  Mantua Maker 1865 - 1880 

My decision was mainly based on my experience with their Regency Stays that turned out so easy to make and very comfortable to wear. The description on the website is a little confusing, the corset does feature bust and hip gores and is adjustable in length ... perfect for my long upper body and twins in dire need of support!

Crinoline: Truly Victorian 1858 Round Cage Crinoline

I wanted big, bigger, huge .... and the pattern seemed easy.


Petticoat: Truly Victorian Free Hoop Skirt Petticoat

Another Truly Victorian gem and totally FREE! even better there is no hemming to be done


Skirt: Truly Victorian 1859 Double Skirt

Yes yes more Truly Victorian but the patterns are easy to read and look great


Bodice: Truly Victorian 1860 Ball Gown Bodice

Well a ball gown bodice isn't really meant to be worn on a field day but I don't really like the high neck day wear so I decided cheat just a little


Accessories: 

Hat, Bag and Parasol I will make up as I go along ... not sure about the design yet.


In case people were wondering where to get patterns and particularly corset making supplies in Ireland ... Vena Cava Design have a great website and ship within a few days. There are a few shops who sell some of the basics in Dublin ... drop me a line if you want to know more.